


Use OpenAI's Assistants to build an app in 15 mins
Tuesday, November 14, 2023
Our team attended OpenAI's DevDay and like many others, were amazed at all the announcements— we couldn't wait to start building. Today we're sharing our learnings from using the Assistants API, and how you can build your own PDF extraction app in 15 minutes. We'll build a grant eligibility parser (more on that later) but the same principles can be applied to any PDF extraction.
👉 To hear more about how AI can accelerate the climate transition, check out our CEO's talk on OpenAI's DevDay main stage.
What are we building?
Today we're building a grant eligibility parser using the Assistants API. If you've never applied to a federal grant this problem likely feels trivial. Let me explain.
The Problem
Climate companies need grants to survive. And we need them to survive to solve the climate crisis. Today, applying to a grant is painful as it means writing hundreds of pages of content. The pain starts before you even start applying, however: finding which grants you are eligible for is a process that can take hundreds of hours of navigating through PDFs. The funding opportunity announcements (FOAs) are over a hundred pages long, with details about who is eligible sprinkled across the pages.
tldr: It can take hours to establish if you’re a good fit for a federal grant program.
The Solution
Using OpenAI’s new Assistants API I built a tool that extracts this information in just a few seconds, which quite literally can save someone hours of research.
For context, working on similar problems prior to the Assistants API often required the following process:
Chunk the PDF into a series of vectors and store these in a vector DB like Pinecone or Weaviate.
Find the right queries for this vector DB to find relevant snippets for eligibility requirements, and use these queries to extract the snippets.
Pass these snippets to an LLM call manually, crossing your fingers that the snippets are correct, and that the model will siphon the correct information out of them.
This pattern is relatively common among modern AI apps, and under the hood, it’s likely that OpenAI’s assistants are performing this retrieval-augmented-generation (RAG) in a similar manner. The benefit, of course, is that using these assistants, we don’t have to worry about the implementation of this RAG pipeline at all, and we can focus purely on building the right prompts to extract the relevant information from our documents.
For the sake of simplicity, we’ll be building an app with only one workflow, where a user loads the page, enters a direct download link to the grant PDF (more on this later), and we parse out the criteria. The stack we’ll use for this will also be quite simple, with the whole thing living in a NextJS monolith (sorry Python-enjoyers) using TypeScript and Tailwind throughout.
Before we start: Terminology and the lifecycle of an OpenAI Assistant.
If you’ve used LLM style agents before, that’s a helpful starting point for thinking about assistants; you can think of them as a tailored instance of a model with a more durable lifespan than a standalone completion/chat call.
Assistants live for as long as you need them to, and you can continuously interact with them by creating threads
Threads represent a single “conversation” between you (or your code) and the assistant. You create a thread with a handful of messages, run the thread, get output back, and continue on as needed.
When you run a thread, you’ll get the ID of that run ********back as an output. At any point in time this run will have a specific status and relevant data depending on that status. Fore example, it could be
in_progresswhile the LLM is running, it couldrequires_actionif the run is paused awaiting more input, orcancellingif you’ve called the run off. The full lifecycle of an assistants run is as follows:
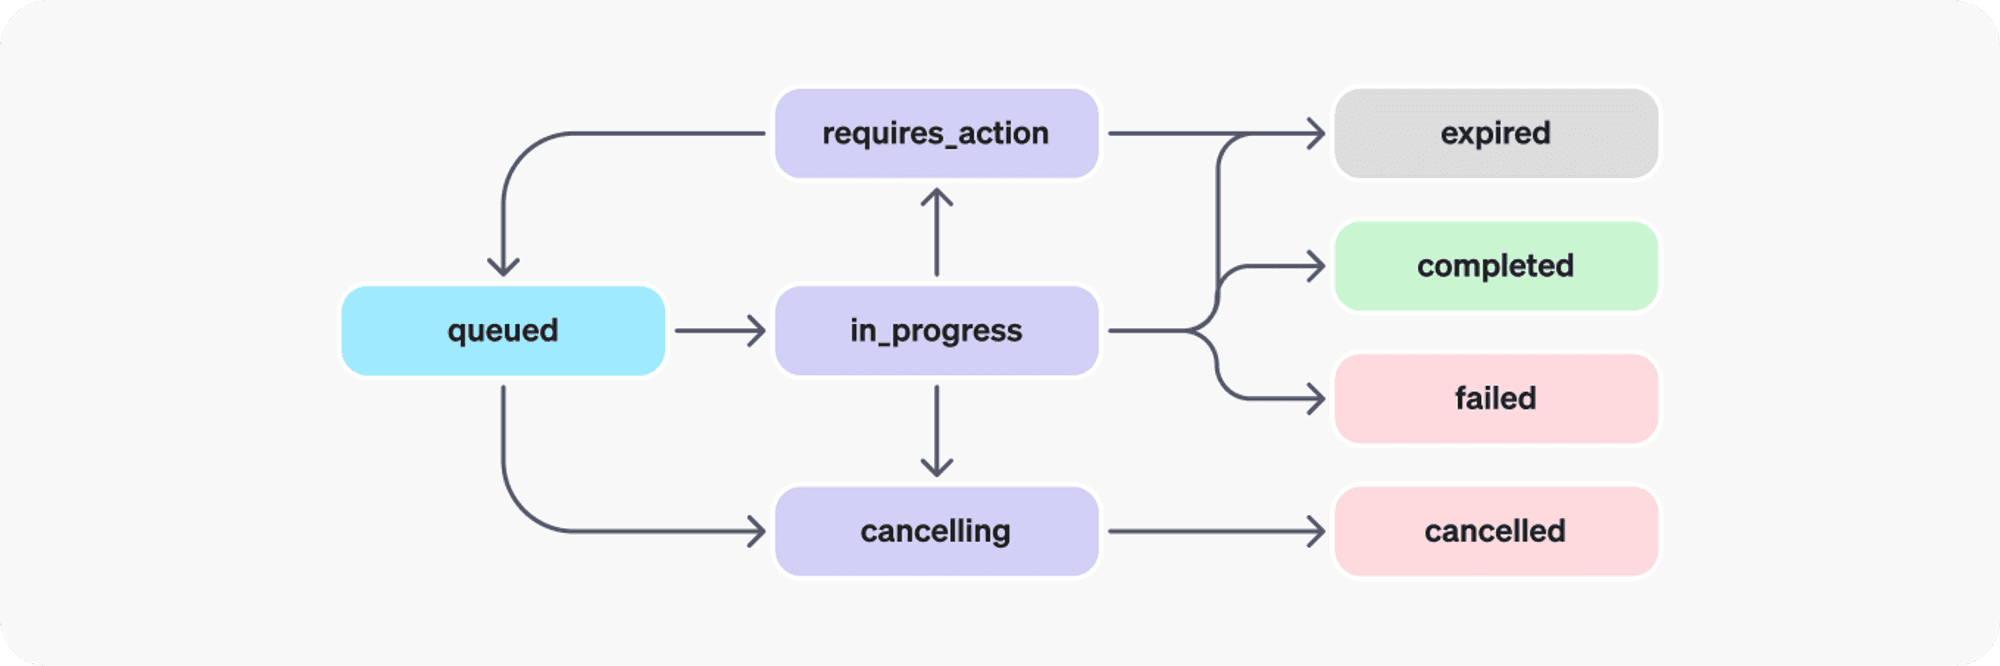
source: https://platform.openai.com/docs/assistants/how-it-works/runs-and-run-steps
Getting set up
Clone/deploy a fresh copy of Next.js Boilerplate and install the openAI NodeJS package with npm install openai.
Once you have these installed, simply npm run build to build the project, then npm run dev to get everything started. Navigate to http://localhost:3000 in your browser and your bootstrapped app should be up and running!
Building the shell of our app
We’ll be brief here as we’re mostly interested in the OpenAI side of this project, so feel free to clear out Vercel’s boilerplate and replace page.tsx with the following basic UI
This should leave us with a basic page like so:
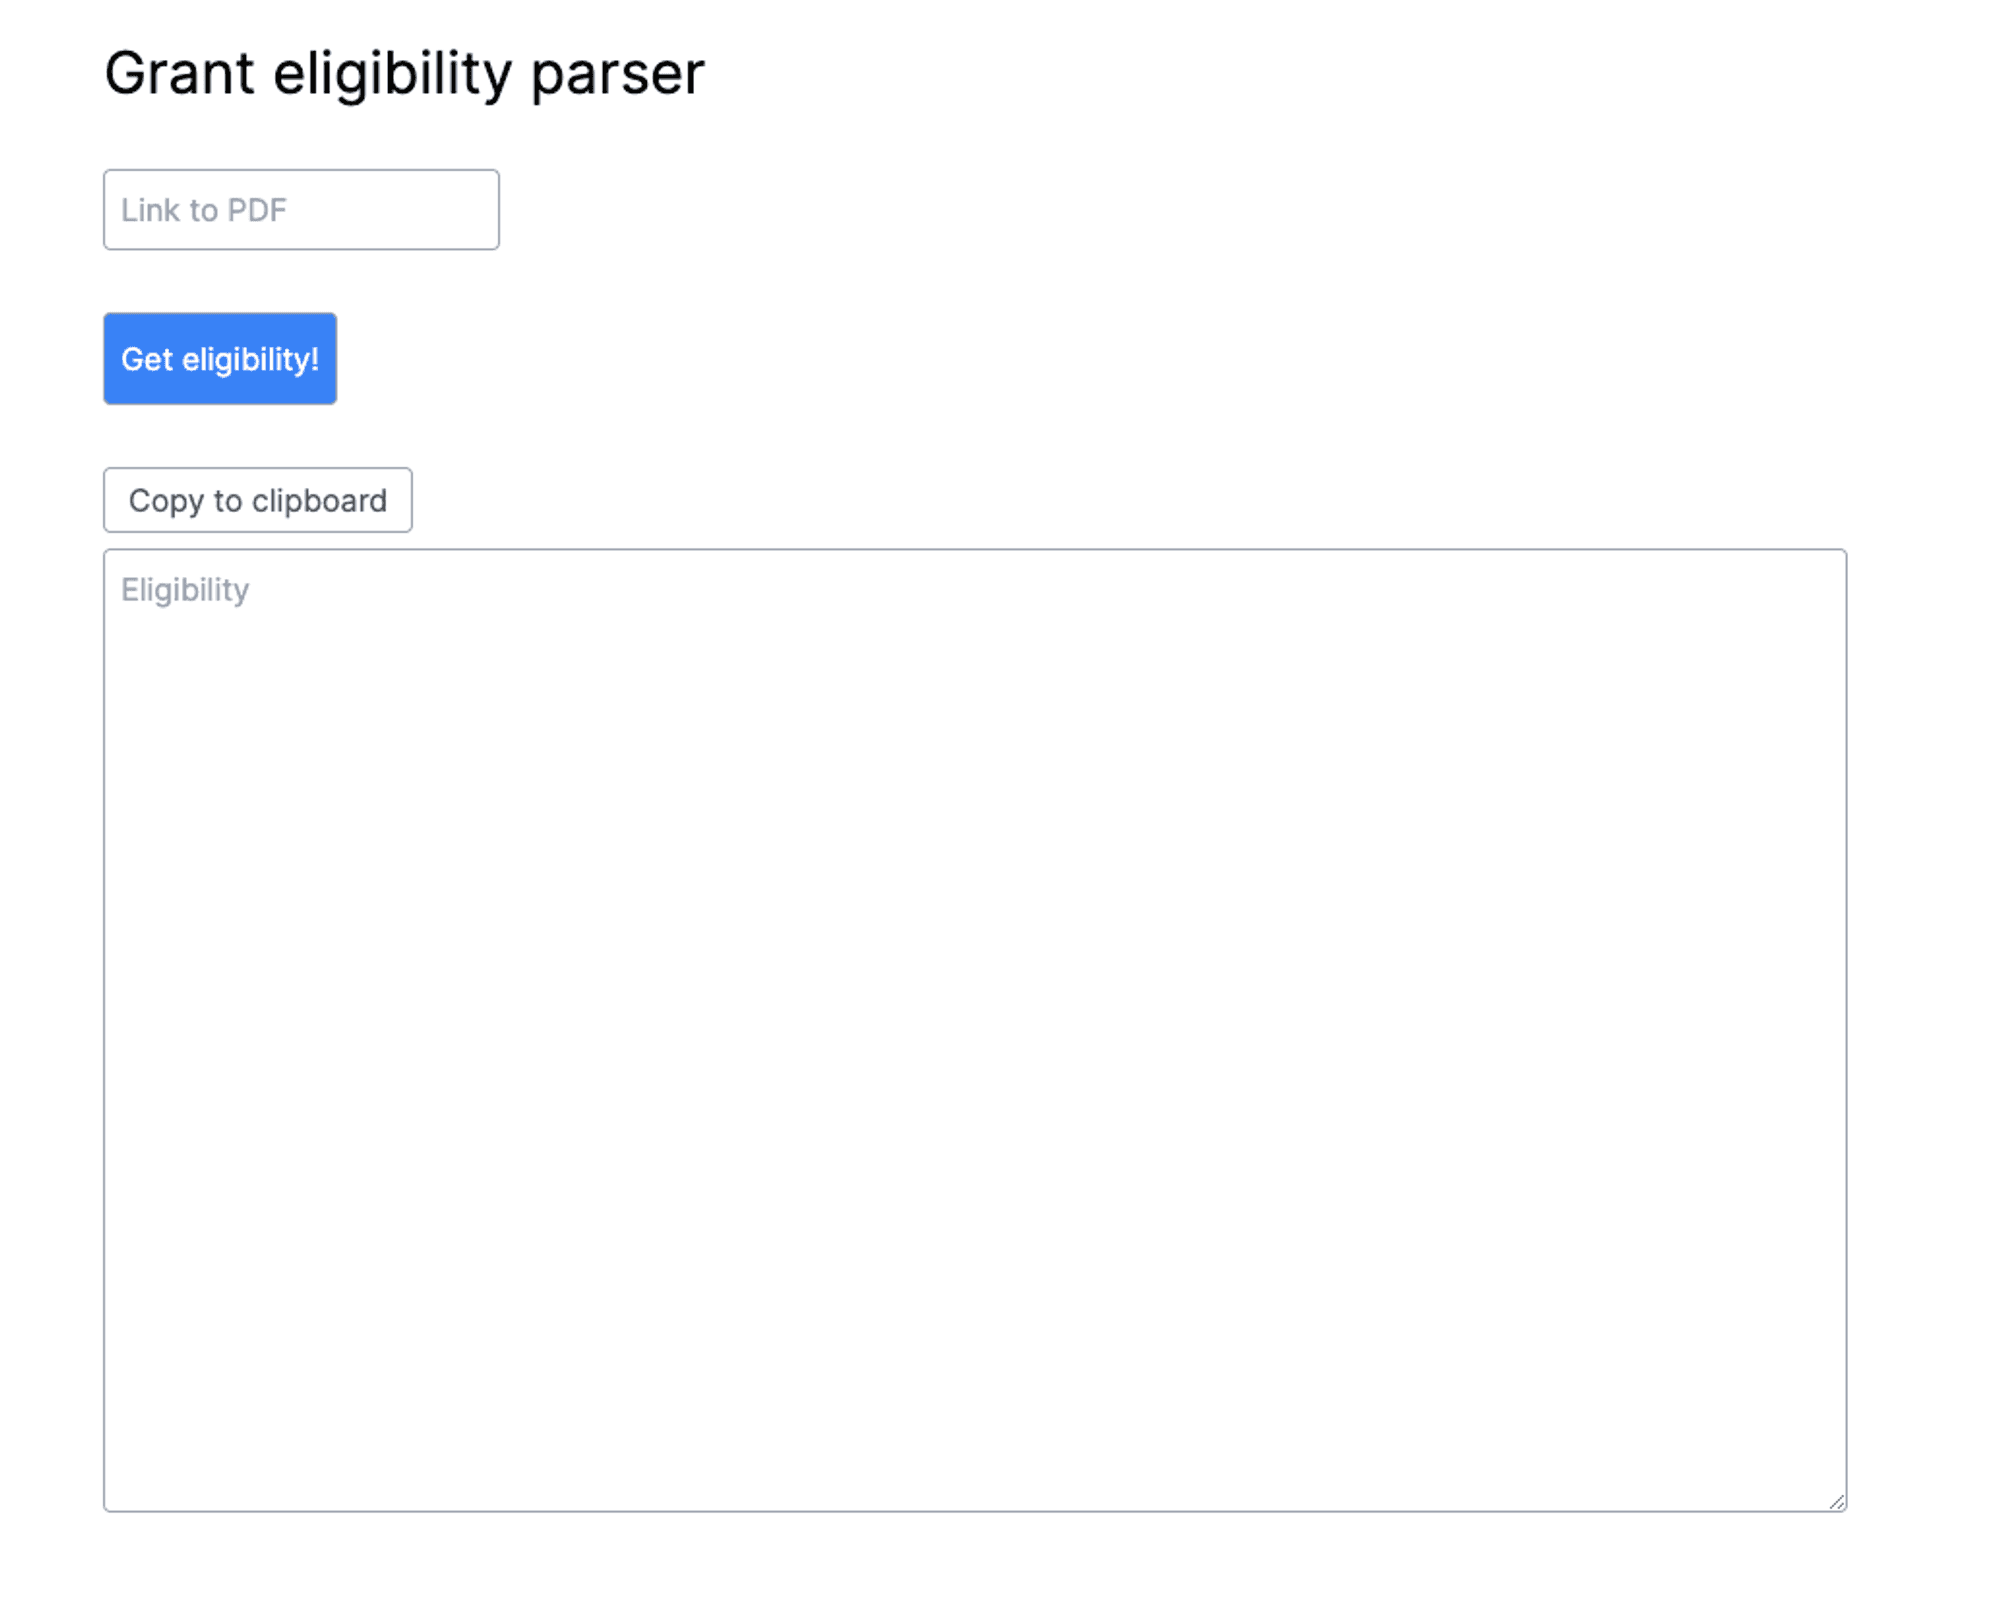
Beautiful, right? (I am not good at the visual part; usually our founding designer Deo tells me how to make things pretty, but for some reason he didn’t want to spend his Sunday evening parsing eligibility with me 🙁).
For our backend, we’ll just build one API route, create a file route.ts under the path app/api/parseEligibility, this will automatically set up our endpoint using NextJS’ new app router. Here we can set up a basic POST handler that takes in a pdfLink from the request body and handles the parsing from there!
One thing to mention is that currently openAI’s file API requires the file to actually be passed to it in order to be properly uploaded - this means we’ll be downloading the files locally on our server (temporarily) so we can get them into OpenAI. There’s likely an elegant way to stream the file content directly from your frontend into OpenAI - but that’s a discussion for another day.
With that in mind, our initial API endpoint looks something like this:
Now we can upload our file to OpenAI with a simple call:
With this file, ready, we can finally set up our assistant!
Building the assistant
Assistants are remarkably easy to spin up - the only required parameter is the model type. In our case, we’ll also pass in a name and description (mostly for readability), initial instructions (which can be thought of like the system prompt in a normal chat/completions call, a set of tools for our assistant to use, and the ID of the file we’re looking into. Additionally, we could add additional metadata to our assistant, but we’ll leave that out for now. Our basic assistant looks like this:
Note that the
retrievaltool is what allows ourEligibility Creatorassistant to search through the grant file we’ve passed in, and thecheckEligibilityFunctionwe pass in allows us to define a structured output for the calls we’ll make to our assistant.
Important: Why are we using a function call?
OpenAI function calling allows you to describe functions, and the model you call will “intelligently choose to output a JSON object containing arguments to call one or many functions” (Function calling). Often this allows OpenAI calls to return the necessary arguments for a function call that your code will run after the call is complete, but in our case, we’re using the function call purely for the consistency it can “guarantee” us in our results. This has important implications that we’ll talk about later on.
With that, our assistant is built, so all that’s left to do is create a thread with our actual prompt and get the results!
Creating and running a thread
Creating threads is again, very simple, there’s no required arguments - just pass in the user messages you want (along with the relevant file ID’s) and let the AI do its magic. In our case this looks like…
Note that you can’t pass AI or system messages to a thread, this is because thread’s are designed to be an actual back and forth between users and the AI, so the AI messages that would normally be programmed into a completions call instead come from the model itself.
With the thread created, we can run it with
Note that the run returned here is not finished- since threads are effectively long running operations, we actually have to continuously poll on this run until the result shows up - OpenAI plans to change this soon, but as of writing, this is the only way. Let’s create a simple polling loop:
When this loop is finished, we know our runResults variable is populated, so the last part of our job is to get the function output from our results and return it to our frontend app.
Note: If you’re files and assistants don’t exist in persisted storage, it’s a good idea to delete them after use with
Getting our results
As mentioned earlier, we instructed the model to output to a function call - which means instead of being in a completed state, our assistant should actually be in a requires_action state, since it expects us to call the function and come back to it with the output of that. Since we’re not really going to call a function with this, we’re just going to parse out our function call and return it:
In our production system we have lots of checks to validate the output before we return it, check out the complete example here.
And that’s it for our assistant API endpoint! Easy, right? Now all that’s left is to call this endpoint from out frontend and output the result to users. Our getEligibility function from earlier now looks like this:
Our criteria arguments come back as a string of JSON, so we have to parse this out, take the criteria, and then we prettify it as a string again before returning it to the user.
Wrapping up
With our system fully working, we’ve now built out a fully-fledged assistant to find our eligibility criteria. For the full source code, including error handling and rate limiting, see the original repository. We’ve also decided to host the app we built for free at https://grant-eligibility-peach.vercel.app/, you’re welcome to use it!
Things we’re still figuring out
The advantage of OpenAI’s assistants is that so much of the complex RAG implementation is hidden from us as users. This is also a disadvantage, since, as one piece of a large and complex system, it’s important to know how your dependencies are working in order to properly extend and debug them.
How this pattern can help us build the rest of our upcoming grant discovery tool - we’re building software to help dynamically find grants that are a great fit for our users. Eligibility is one part of this, but there’s so much more to consider - how to properly represent a company’s data such that it can be matched with grants, how to build an accurate and up-to-date database of all grants etc. etc.
Anyhow, putting this together this was a fun way to explore assistants while building a useful tool, but it does a relatively poor job of addressing the underlying challenge of finding the right grants, and winning them. That’s why we’re building Streamline - a platform to accelerate the discovery, drafting, and and management of grants, RFPs, permits and more.
Sound interesting? Reach out to me at eric@streamlineclimate.com to learn more.

